
If you’ve ever been mesmerized by Grant Sanderson’s fluid and captivating animations on his YouTube channel, 3Blue1Brown, you might be wondering how he creates them. The answer lies in a homemade animation engine called Manim, built with Python. While Grant Sanderson’s original version is available, he recommends beginners start with the community edition. This version is actively maintained, updated, and perfect for those looking to dive into the world of animation. Personally, I discovered Manim while working on videos about neural networks for my YouTube channel. Its powerful features made it an ideal tool to bring complex concepts to life. Take a look at my neural network blog posts for more in-depth explanations.
The examples and descriptions in this post use Manim community edition.
Objectives
The official Manim documentation pages contain large numbers of examples, so I will instead focus on building more complicated animations to show how they can work together. One of the great things about Manim is that you can easily automate several parts of the animation process.
I also made a video on my YouTube channel that covers the basics and some more:
To start, we need to install the package.
Manim Installation With Conda
Look at this link for instructions on different installation methods. I prefer the simplicity of conda, so I’m using the appropriate instructions in this page.
Basically, you just need to create a new conda environment and install manim from the conda-forge conda channel. Another benefit of using conda is that you will get ffmpeg and other dependencies installed automatically as well.
conda create -n my-manim-environment
conda activate my-manim-environment
conda install -c conda-forge manim
If you want to animate equations, you need to have LaTex packages installed. If you happen to be on Fedora 38, you can install LaTex libraries with any of the following commands:
sudo dnf install texlive-scheme-basic
sudo dnf install texlive-scheme-medium
sudo dnf install texlive-scheme-full
I would suggest to install the full package. It is about 5 GB after installation. I tried installing the medium package to save some space and my animations kept failing, so it seems Manim uses a good amount of LaTex packages.
Animating With Manim
The easiest way to practice with Manim is to use Jupyter notebooks, in my opinion. You can write code and see the resulting animation right there on the cell. Therefore, you can install Jupyter notebooks inside your conda environment like this:
conda install jupyter
Once installed, launch a new notebook from the terminal or you can create a notebook file from inside VSCode.
I’ll leave a link to the full Jupyter notebook I’m using for these examples. Let’s start with a simple example with some text and shape transformations:
from manim import *

config.media_width = "75%"
config.verbosity = "WARNING"
%%manim -qh ShapeAndTextScene

class ShapeAndTextScene(Scene):
    def construct(self):
        text = Tex("Example Scene With Some Shapes")

        circle = Circle()
        circle.set_fill(BLUE, opacity=0.8)

        hexagon = RegularPolygon(n=6)
        hexagon.set_fill(GREEN, opacity=0.5)

        self.play(Write(text))
        self.play(text.animate.shift(UP*3))
        self.wait(0.3)
        self.play(DrawBorderThenFill(circle))
        self.wait()

        self.play(Transform(circle, hexagon), run_time=1.5)
        self.wait(0.5)

        self.play(hexagon.copy().animate.shift(LEFT * 3))
        self.wait(0.35)
        self.play(hexagon.copy().animate.shift(RIGHT * 3))
        self.wait()
Explaining the Code
For starters, the first line above: %%manim -qm ShapeAndTextScene is a magic command for Jupyter. It renders the scene right under the cell. Here, ShapeAndTextScene is the name of the class we want to render. The qh flag indicates the render quality (h for high), and here are the other options you can select:
-q, --quality [l|m|h|p|k]      Render quality at the following resolution
                                 framerates, respectively: 854x480 15FPS,
                                 1280x720 30FPS, 1920x1080 60FPS, 2560x1440
                                 60FPS, 3840x2160 60FPS
You could of course just write your animation scenes in a regular Python script and render the scene from the terminal with the following syntax (more info on that here):
manim -qh YOUR_PYTHON_SCRIPT.py YourSceneClassName
The next part is defining the scene class. We normally inherit from Manim’s Scene, although there are other options.

Rendered portion of the code for the previous animation. This image was also generated using Manim’s Code class.After defining the class, you will program your scene inside the class function construct. Here is where all the animations will take place. Notice in the snippet above that I’m simply defining the objects that will appear in the scene. However, if I were to run the cell like that, nothing would show up. You need to animate or add those object into the scene:

Whenever you want to animate something into the scene, you can use self.play and combine it with different animation methods: Write, Create, DrawBoarderThenFill, Transform, etc. You can also set the run_time parameter (in seconds) to control how long it takes for that particular animation to complete.
If you wanted to add objects to the scene instantly without animating their creation, you can simply use self.add(...).
When moving Mobjects from one place to another, you can use the built-in vectors: LEFT, RIGHT, UP, DOWN, etc. to tell Manim where to place them. These are numpy arrays of shape 1×3 (for x,y,z dimensions). Moreover, as the example shows, you can multiply them by other vectors or scalar to scale their impact. In this case, I used LEFT * 3 and RIGHT * 3, which means the first hexagon will shift to the left by 3 left units, and the other one will shift to the right by three right units.
More Manim Examples
I feel that Manim offers almost unlimited options to achieve your animation goals. Maybe “unlimited” is not the right word, but I can certainly create everything I want to visualize using it. Since I’m working on a neural network video to complement my posts, I wanted to showcase examples of matrix animations on Manim:
%%manim -qh MatrixExample

class MatrixExample(Scene):
    def construct(self):

        elements1 = [
            [0.158, '\\\\pi', -4.325],
            [11   ,    0  , 3.876],
        ]

        #create Matrix Mobject
        mat1 = Matrix(
            elements1,
            left_bracket = '\\\\{',
            right_bracket = '\\\\}',
            v_buff=1.3,
            h_buff=2.5,
        )

        #create column rectangles ahead of time (they will added to the scene later)
        col0 = SurroundingRectangle(mat1.get_columns()[0])
        col1 = SurroundingRectangle(mat1.get_columns()[1])
        col2 = SurroundingRectangle(mat1.get_columns()[2])

        #animate creation of the matrix
        self.play(Create(mat1), run_time=2)
        self.wait()

        # animate surrounding rectangles for each column
        self.play(Create(col0))
        self.wait()

        self.play(Transform(col0, col1, replace_mobject_with_target_in_scene=True))
        self.wait()

        self.play(Transform(col1, col2, replace_mobject_with_target_in_scene=True))
        self.wait()
        self.play(Uncreate(col2))

        # change size of the entire matrix and shift its position
        self.play(mat1.animate.scale(0.7).shift(LEFT*3.5 + UP*2))
        self.wait()
Grouping Mobjects
One very useful class of Manim is VGroup. It is a container class where you can group many different objects. It makes animating easier because you can apply transformations, shifts and effects to the entire group instead of doing it for each element individually.
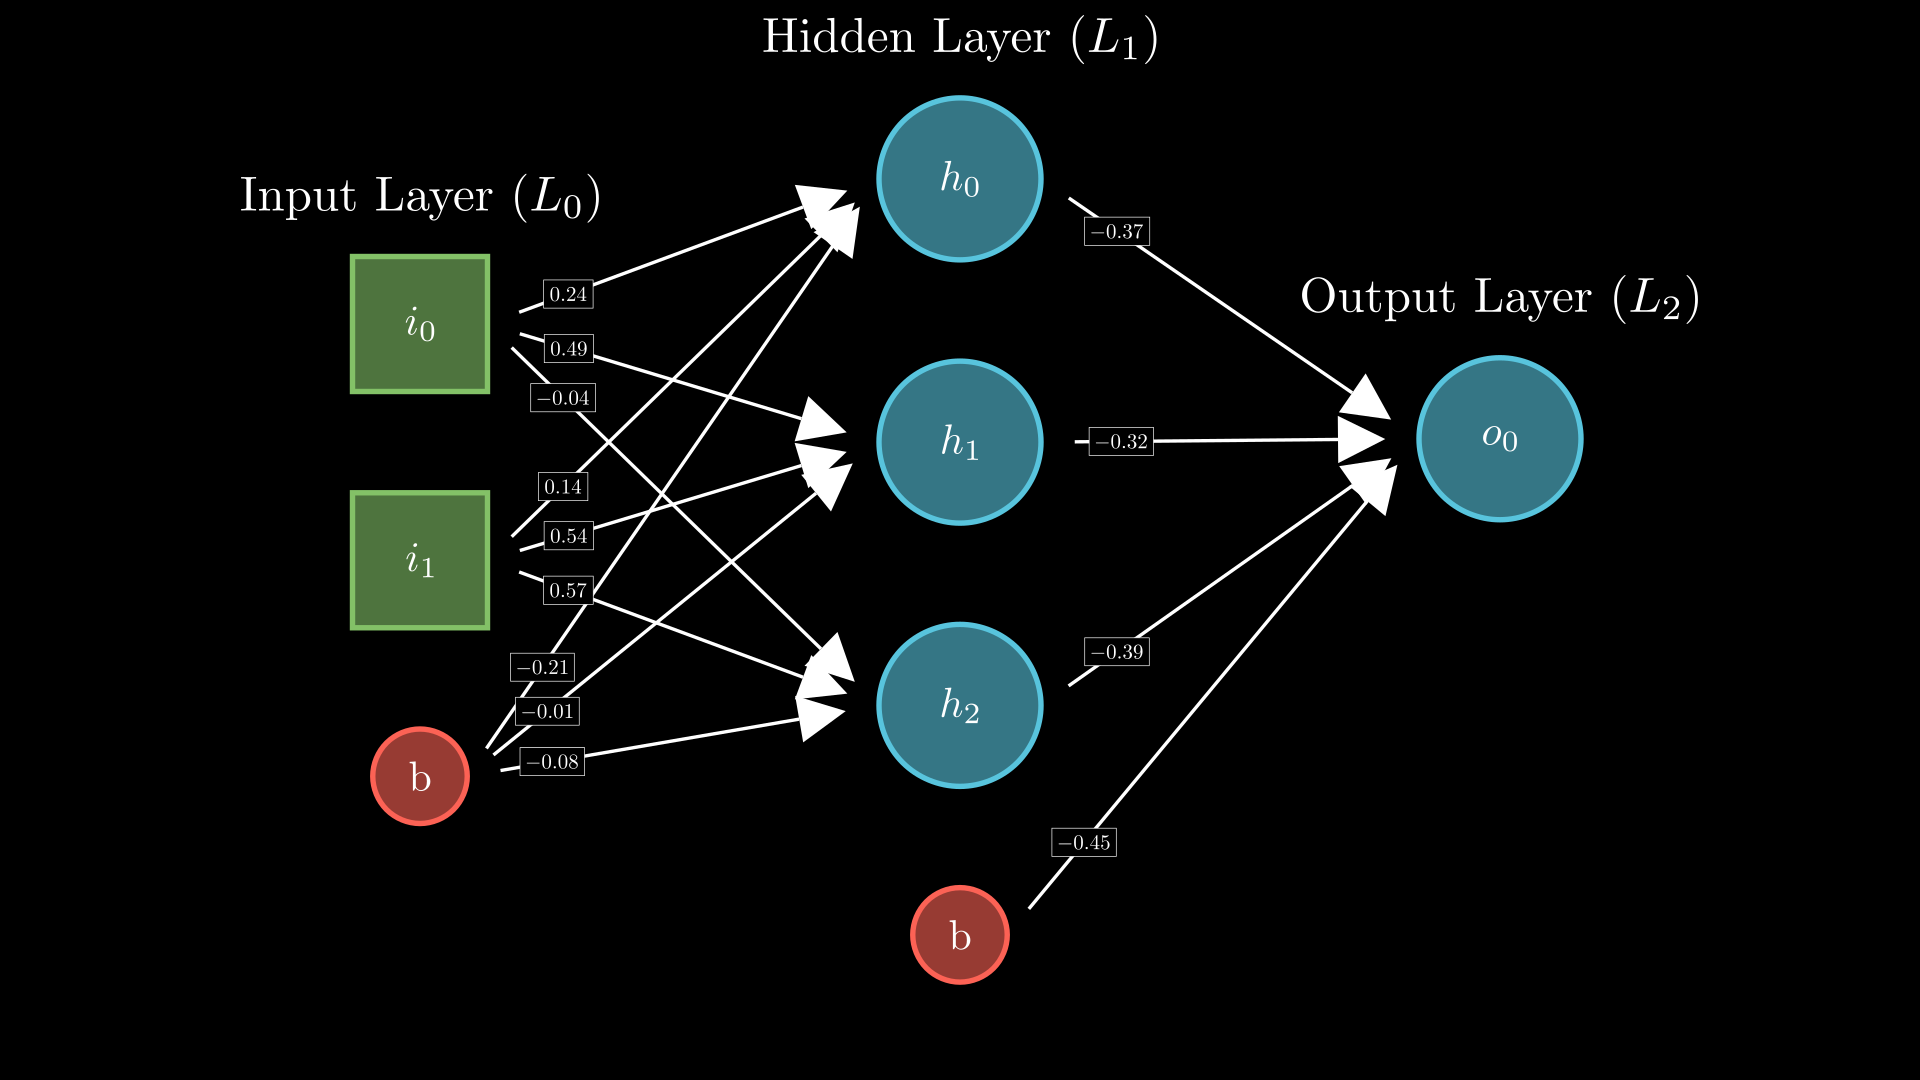
This post is getting a bit long for now, so I’ll explain the code for the following animation next week. For now, simply note how each layer in the following neural network is a VGroup that contains the node shapes, node labels, and layer label on top. That’s why they can move together with a single command.
class TestNetwork(Scene):
    def construct(self,):

        #--Constants and Stuff
        _shift_val = 4
        _run_time  = 1

        #--Create the layers
        input_layer = generate_network_layer(
            num_nodes       = 2,
            include_bias    = True,
            layer_type      = 'input',
            layer_idx       = 0,
        )

        hidden_layer = generate_network_layer(
            num_nodes       = 3,
            include_bias    = True,
            layer_type      = 'hidden',
            layer_idx       = 1,
        )

        output_layer = generate_network_layer(
            num_nodes       = 1,
            include_bias    = False,
            layer_type      = 'output',
            layer_idx       = 2,
        )

        #-- Draw the layers
        self.play(*[Create(item, run_time=1) for item in input_layer])
        self.play(input_layer.animate.shift(LEFT * _shift_val))
        self.wait(0.5)

        self.play(*[Create(item, run_time=_run_time) for item in hidden_layer])
        self.wait(0.5)

        output_layer.shift(RIGHT * _shift_val).shift(UP * 0.75)
        self.play(*[Create(item, run_time=_run_time) for item in output_layer])
        self.wait(0.5)

        #----------------------------
        #-- Create arrows
        input_hidden_arrows  = generate_layer_connections(input_layer[0], hidden_layer[0])
        hidden_output_arrows = generate_layer_connections(hidden_layer[0], output_layer[0])

        self.play(*[GrowArrow(arrow) for arrow in input_hidden_arrows])
        self.wait()

        self.play(*[GrowArrow(arrow) for arrow in hidden_output_arrows])
        self.wait(2)

        #------------------------------
        #-- add labels to connections
        self.play(Uncreate(input_hidden_arrows), Uncreate(hidden_output_arrows))
        self.wait()

        labeled_input_hidden_arrows = generate_random_labeled_layer_connections(input_layer[0], hidden_layer[0], font_size=15, add_frame=True,)
        self.play(*[GrowArrow(arrow) for arrow in labeled_input_hidden_arrows])
        self.wait(0.4)

        labeled_hidden_output_arrows = generate_random_labeled_layer_connections(hidden_layer[0], output_layer[0], font_size=15, add_frame=True,)
        self.play(*[GrowArrow(arrow) for arrow in labeled_hidden_output_arrows])
        self.wait()
The code above does not show the helper functions generate_network_layer, generate_layer_connections, or generate_random_labeled_layer_connections. Those classes automate the process of grouping several shapes so I then shift the entire layer to the side. Check the notebook at this link to study the code. I will go into more detail in my next post.
Conclusion
This was a pretty quick and simple introduction to Manim Community edition. My main goal was to show some examples that make use of different features in the engine. However, I realize that I haven’t covered the basic building blocks and basic functions. I think the official documentations do a pretty good job at explaining those aspects.
If you have any questions or recommendations, don’t hesitate to leave a comment and stay tuned for my next posts about animating with Manim.