
Welcome back to another week of tinkering with Python. This time, I wanted to explore a computer vision project I built a while back leveraging OpenCV capabilities. It is a vehicle-counting system that’s supposed to run on embedded devices (I have not actually tried that part yet). Also check my previous post on making a cryptocurrency transaction log application with Flask and a MySQL database.
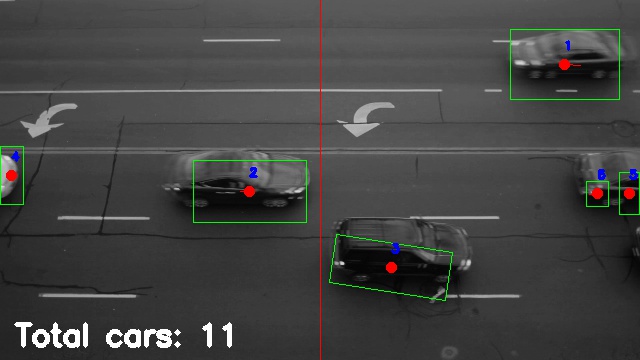
Initially, I created this project for a summer of research at Berea College. Since then, I added some stuff to it and repurposed it for teaching and sharing. I’m not an expert in computer vision. With that said, I think this post will help a lot of people to get started with OpenCV in Python. Here is a sneak peek of how the project works:
The Project at a High level
The breakdown of the inner workings and parts of the project is as follows:
- Read video source (camera stream or video file)
- Perform some adjustments to the image (color conversions, resizing, etc)
- Create a background reference image
- This image is used for background subtraction. Ideally, it is an image containing an empty road. For this project, I’m creating a background image that changes over time as an average of successive video frames.
- Apply background subtraction between new frame and reference frame
- Apply a bunch of filters to the result of the subtraction in the previous step
- Run a motion detector counter on each filtered frame and compare to the previous one to do pseudo-tracking of motion
This post is complementary to a video I made on the project. You can watch it as a complementary material to this post. In the video, I explain the counting part in detail through animations. Here is the video from my Youtube channel:
Additionally, all the code is available in my Github repository.
Background Subtraction
Originally, when I designed this program, efficiency was the main objective. For that reason, I opted for using background subtraction as the main method of detecting cars on the road instead of machine learning and object recognition. What that means is that the system has no internal concept of what a car is. It simply detects motion and tracks moving blobs to see if they cross a counting line.
OpenCV stores images as NumPy arrays (ndarrays) so background subtraction is simply a matrix subtraction between the reference frame and the current frame. Then, the resulting difference matrix represents motion, or what has changed from one frame to the next.
In my repository, the background subtraction part is performed inside the file traffic_counter.py as part of the main_loop() method from the TrafficCounter class. Below is an excerpt from the relevant part of the code:
def main_loop(self):
    self._set_up_masks()
    rate_of_influence = 0.01
    FRAME_CROPPED = False
    while True:
        grabbed,img = self.video_source.read()
        if not grabbed:
            break
        #--------------
        frame_id = int(self.video_source.get(1))        #get current frame index
        img = cv2.resize(img,(self._vid_width,self._vid_height))
        img = cv2.cvtColor(img,cv2.COLOR_BGR2GRAY)
        if FRAME_CROPPED:
            working_img = img[x:x+w,y:y+h]
        else:
            working_img = img.copy()
        if self.black_mask is not None:
            working_img = cv2.bitwise_and(working_img,self.black_mask)

        if frame_id < self.starting_frame:
            cv2.accumulateWeighted(working_img,self.raw_avg,rate_of_influence)
            continue

        cv2.accumulateWeighted(working_img,self.raw_avg,rate_of_influence)
        background_avg = cv2.convertScaleAbs(self.raw_avg)           #reference background average image
        subtracted_img = cv2.absdiff(background_avg,working_img)
The last line is where background subtraction is taking place. We use OpenCV’s absdiff to get the difference between the reference background image and the current frame. This difference is also a new numpy array containing only positive values.
To illustrate the process better, here is an image of the reference background in one sample video:

and the current image is:

The image above contains moving objects. Now the absdiff method from OpenCV can subtract the differences. The result is the following image:

Applying a Threshold
Now we have blobs only in the areas of the image that changed. However, you can see some “smudges” in areas of the image, and the shapes are very faint in general. The fix for this problem is to apply an additional step using OpenCV’s threshold method. threshold takes a numpy array (an image) plus a threshold value. Here is an example:
##-------Applying threshold
_,threshold_img  = cv2.threshold(subtracted_img,30,255,0)
In the line of code above, first, we pass our faint difference image to the threshold function. Next, we pass three numbers: 30,255,0. The first one is the threshold value. OpenCV will use this value as a cut-off point. This means that every pixel in the image will be changed to either 255 if they were originally above 30, or will be set to zero if they were originally below 30.
Applying a threshold basically turns the faint blobs into binary blobs (pure black and white only). Here is the result of applying this step:

Now the blobs are much clearer to see and the noise is gone.
Drawing Bounding Boxes
After applying the threshold function, we can use OpenCV’s functions to find contours in the image. Below is the code for the function (bind_objects()) that finds car contours in the image and keeps track of the counting:
def bind_objects(self,frame,thresh_img):
    '''
    Draws bounding boxes and detects when cars are crossing the line.
    frame:
        numpy image where boxes will be drawn onto
    thresh_img:
        numpy image after subtracting the background and all
        thresholds and noise reduction operations are applied
    '''
    cnts,_ = cv2.findContours(thresh_img,cv2.RETR_EXTERNAL,cv2.CHAIN_APPROX_SIMPLE)                #this line is for opencv 2.4, and also now for OpenCV 4.4, so this is the current one
    cnts = sorted(cnts,key = cv2.contourArea,reverse=True)[:self.numCnts]

    cnt_id         = 1
    cur_centroids  = []
    for c in cnts:
        if cv2.contourArea(c) < self.minArea:           #ignore contours that are smaller than this area
            continue
        rect   = cv2.minAreaRect(c)
        points = cv2.boxPoints(rect)                # This is the way to do it in opencv 3.1
        points = np.int0(points)

        #Getting the center coordinates of the contour box
        cx = int(rect[0][0])
        cy = int(rect[0][1])

        w,h = rect[1]                   #Unpacks the width and height of the frame

        C = np.array((cx,cy))
        cur_centroids.append((cx,cy))

        #Finding the centroid of c in the previous frame
        if len(self.prev_centroids)==0:
            prev_cx,prev_cy = cx,cy
        elif len(cnts)==0:
            prev_cx,prev_cy = cx,cy
        else:
            minPoint = None
            minDist = None
            for i in range(len(self.prev_centroids)):
                dist = np.linalg.norm(C - self.prev_centroids[i])                #numpy's way to find the euclidean distance between two points
                if (minDist is None) or (dist < minDist):
                    minDist = dist
                    minPoint = self.prev_centroids[i]
            #This if is meant to reduce overcounting errors
            if minDist < w/2:
                prev_cx,prev_cy = minPoint
            else:
                prev_cx,prev_cy = cx,cy
            #prev_cx,prev_cy = minPoint

        _is_crossed = self._is_line_crossed(frame,cx,cy,prev_cx,prev_cy)
        if _is_crossed:
            print(f"Total Count: {self.counter}")
        self._draw_bounding_boxes(frame,cnt_id,points,cx,cy,prev_cx,prev_cy)

        cnt_id += 1
    self.prev_centroids = cur_centroids       #updating centroids for next frame
The first thing we do in the function above is to call cv2.findContours. This function will return a list of contours that OpenCV found in the frame. After that, we go through this list and determine a rectangle coordinate for each contour.
Those rectangles are needed for us to detect if a car passed a counting line. Additionally, we can draw those boxes onto the video to provide a nicer user interface.
I encourage you to take a look at the YouTube video to better see the program in action. Regardless, here is the result of applying this bind_objects function to a frame:

You may notice that we don’t get clean bounding boxes. It seems the system is detecting different parts of the car as independent objects. We can address this problem by applying filters to blur the image a bit.
By blurring the current blobs, the shapes will “bleed” into each other. Then, if they are close enough, the idea is that they will fuse into one. In my code, I’m applying several Gaussian blur filters as well as dilation filters to the image in order to reduce those problems.
Counting Cars
The algorithm to count cars is rather simple. In this case, I’m simply detecting if the centroid of the bounding box for a car has crossed a “counting line”. The counting line is typically placed in the middle of the frame, but it can be changed through command line arguments.
Since my program is not “smart”, it does not perform real object-tracking. This means that on every frame, there is no relationship between the same car at two locations. To solve this, my approach is the following:
- Find all centroids (one per bounding box) in the current frame and store them in a list.
- Read next frame and find all centroids again.
- Calculate the distance between each centroid in the current frame and each centroid from the previous frame.
- The two centroids with the shortest distance are considered to be the same object. The assumption here is that from frame to frame, the same object will be closest to its previous position.
- Now that we decided which cars are the same from frame to frame, we compare the previous position and the current one against the “counting line”.
- If the counting line lies in between the previous and current centroids, the program increases a car counter, because the line has been crossed. Check the video above at around minute 2 for an in-depth explanation.
Command Line Interface
You can test the code with different parameters by using the command line interface I created for it. Check the README file to get a better idea of the options. The most basic options that you will want to use are the video source, the direction and position of the counting line, the maximum number of contours per frame, and the minimum area per contour.
It is important to select an appropriate minimum area for the contour based on the video resolution. You want a minimum area large enough so that most of those little squares pass undetected. However, if the minimum area is too large, some vehicles such as motorcycles will also go undetected. Test around with different parameters and let me know how it goes.
Conclusion
I hope you enjoyed this post on how to use computer vision with OpenCV in Python. OpenCV in general is a very powerful library. I plan on exploring it more in the future. I even got an Oak-D Lite during their Kickstarter campaign so that I can play with it. There are many cool computer vision projects that I want to make, such as a self-driving car, or a robotic talking head.
If you have any comments or questions about the project, feel free to leave a message here in the comment section, or in the Youtube video comment section. Also, consider signing up to the mailing list to stay in touch.